Dress Diary
17th century middle-class outfit
|
06.07.2005 - Part I: Planning It has been quite obvious for a while now that I needed a summer's outfit. Every fair I go to, I've been warm. My larp clothing is just too warm, even in single layers. And this gets quite annoying. There's a limit to the amount of sweat you can smell on a single person. Combine this with the want for a more or less historically correct outfit, and the wonderful stories about Puerto Diablo, and you know why I went shopping for linen. Of course, a period outfit that needs to be suitable for warm weather requires linen. If you have the choice of natural fabrics for the 1600s you get wool, linen, and some very expensive cotton (from Egypt at that time) or silk. I mustn't even think of wool, too bloody warm, and since this would be a middle-class outfit for a well-to-do seamstress (me), I went for linen.
So, the neon-red it would be, and I knew that I would be adding blackwork to the kirtle. It is just the kind of evenly-woven fabric that would allow easy embroidering, and with the donation of 57 colours of embroidery silks by my very supportive grandmother, I knew what was coming.
But first I will be needing to settle on a design. I know that the 17th century women more often wore a skirt and top and a kerchief in their necks to prevent sunburn, but this was mostly for the peasantry. I can imagine the middle-class women like servants and seamstresses would wear something more appealing. Sadly, Holkeboer (Katherine Strand Holkeboer - Patterns for Theatrical Costumes) focuses mainly on the elite in this time period, and portays whole Tudors: forepart, gable headdress and Tudor sleeves. *shudders* If I don't want to wear something, it's a real elite Tudor.
But all this reading has gotten me thinking on a design, and I think it will turn out a bit Ever Afterish, only without the umpire waist, with lace-on armpieces and side lacing.
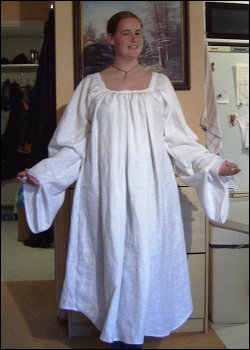
21.07.2005 - Part II: Let's skip the sketching! Having browsed around various sites on the internet, trying to find images of something I like best, I must say 17th century peasants wore boring outfits. So I'll probably indeed be going for the Ever Afterish with a seperate over dress like in Jen Thompson's Flemish peasantwear. So I forewent the sketching and just started on my chemise.There's a bit of pressure on it all of a sudden, since Castlefest is rapidly approaching, and I really need a summer outfit by then. I'm using Jen's Camicia pattern, the cheerful period potatoebag, combined with 3,5 meters of linen, a floor, a long ruler (150cm) and my favourite imperial to metric converter. I can't understand how Americans can measure out 3/16th of an inch without a ruler, but that will probably always be a mystery to me. Cutting out the fabric was fun, especially when I found out my linen was so strong it couldn't be torn properly. I then continued to serge the gussets to sleeves, and sleeves to front and back panel, before doing the whole French seam thing. When French seaming a camicia, remember to follow the steps in the same order. If you first add gusset to sleeve, and then sleeve to front, also use this order when French seaming. I found that out the hard way. I'm almost done with the chemise. I still have to hem the thing and add cuffs, or maybe a drawstring, or...I don't know yet how to finish the edges. And then all that's left is gathering the neckline.
25.07.2005 - Part III: The cheerful period potatoebag. 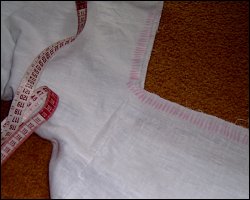 Yesterday and the day before that, I worked on my chemise again. In total, a little over 3,5 hours. But at least the chemise is done now. Yesterday and the day before that, I worked on my chemise again. In total, a little over 3,5 hours. But at least the chemise is done now.
I really hated doing the gathers. The worst thing of it was not making all of the markings, approximately half a centimeter apart; no, the worst thing was running a thread up and down and up and down through those markings...twice! That was a long long cleavage. There's indeed something to be said for cleavage that runs so wide that you have to hold it up in front of your tummy. The sad part is that it has to be gathered into something smaller that will actually stay put on your shoulders. After the gathers, I continued to hang it all on my dressdoll and let my lovely boyfriend try to make heads or tails out of things. The gathers were a little off center in the back, having more gathers to the left of the place where the tread came out, than to the right. A lot of shifting ensued, and he ended up pinning the whole thing to the doll to have it stay in place. But that too, was soon done.
I had cut a strip of approximately 7cm wide for the length of the selvage of the fabric. This was pinned to the gathers and then sewn on. I had to undo two small bits, because one ridge of the gathers was displaced by the pressing motion of the foot and the top of it was showing, but these were just small bits.
It also takes up some time. I didn't mind sewing the strip to the gathers at all. After all, the cleavage had been reduced to a third or less of its original measure. And sewing by hand is quite soothing. I used some extra-strong thread I had bought for the gathers (those running stitches stay in to keep the gathers closed).
01.08.2005 - Part IV: The bodice.
I must say that when you look at the pattern itself, it's quite disappointing how modern it is. Of course, nowadays people expect darts to give you the figure you need. So step one was to draft out the darts. There were two in the center front, and these were easily remedied. The day being hot as it was, I decided to make a mockup out of thick green wool. Just in case there might be a surprise glacier around.
The rest of the afternoon was spent sewing the innards of the bodice. Wanting to line it with sisal rope (instead of hemp cord, it was all I could get my hands on), I ended up cutting two more bodices out of plain off-white canvas. These were also put together quite swiftly.
02.08.2005 - Part V: Boning. Well, a lot has happened since the last bit I wrote about my Red Kirtle, and it's all done by the time I'm typing this. I'll have to recount on a daily basis though, for the nice little diary-aspect.Steelweaver did indeed bring over artificial whalebone, and I had already bought a big roll of sisalrope. These two combined should make the boning for the bodice, and I had hoped to use it in a corsetry-fashion, to really support and keep up the Titans.
Hello mr. Seamripper. I tore out the five or so channels I had already put in and started over. I had put a big blue chalk line where center front was, and I figured out how to make the boning channels wide enough for both the artificial whalebone and two lengths of sisalrope next to one another. Starting on mid-front, I first sewed to the left of that line, and then to the right of it, all of the channels needed. Where the straps came out of the bodice, I made a straight line towards armpit-hole, so that the boning would not need to go all the way up. Having boning in shoulder straps probably isn't comfortable at all anyway. I sewed the channels all in, from side-seam to side-seam, and then sat on the couch getting the sisalrope all in. The stuff pricks like mad, and as soon as it all was in and cut to size, I vacuumed the room so as not to go mad with itchy prickly things. At the top, I sewed horizontally just above the line where the boning ended at the straps' place, so the boning would not pop out, and the bottom of the bodice I hemmed with bias-tape. I wanted to make sure none of that damned prickly stuff could reach my skin, even if there would be a chemise underneath. The last bit of work for the day consisted of attaching the outer bodice of red linen, to the lining. I pinned everything down and sat down with needle and thread.... A few hours later, it was done. My digital camera broke down on me, so I don't have all too many pictures of the rest of the construction process. I'm still waiting for the roll of film to be developed.
|
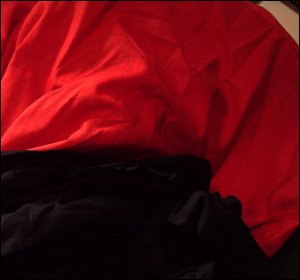 It being summer, linen was available on the market. My favourite salesman sported it for € 5,- per meter. A little on the expenisve side, but he had a lot of colours and it was all pre-washed. One of the other stands had a very polite gentleman who let me look at his fabrics, displaying them for me to ponder upon and then leaving me to make my well-informed dicision, had them for only € 3,- per meter, but only in limited colours. Pale orange, neon-red, jeans-blue and sky-blue were the options. I considered the blues, but decided that they would look too much like jeans. The orange looked like it was plant-dyed, though it was the kind of colour that will only look good on people with darker hair (and or skin) than mine. Being a natural blonde and an earthly redhead (henna), I decided against the orange. And red is very period for kirtles. Really.
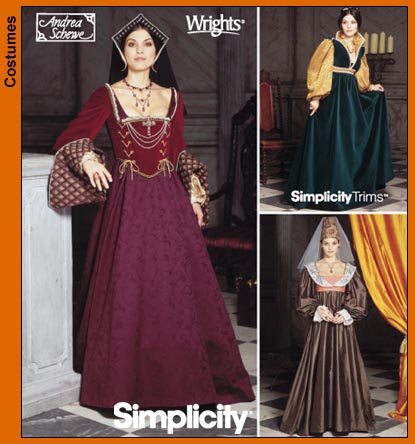 Onwards my brave friends! Friday Steelweaver came over once again, and after tying up some loose ends, I sewed on my bodice. The first hurdle to jump was the pattern. I had seen pictures of period-inspired patterns, but I didn't feel like drawing a pattern from scratch. I dug out my box of patterns, and lo and behold! A pattern that might be usable. Simplicity sometimes comes up with stuff that looks quite correct. I bought this pattern because Dawn reviewed it as "Did they actually get the Tudor sleeves right this time?". I'm talking about Simplicity 9929, which mixes styles from the 16th c. Burgundian (the two smaller images, with umpire waists) to the 17th c. I was aiming for. All I needed was the bodice, after all.